How to check the RID pool in active directory
Hello All,
Hope this post finds you in good health and spirit.
This post is regarding how to check the RID pool in active directory or how many RID’s are available in your domain.
How to check the RID pool in active directory
We should know about RID master and its purpose and how it works before checking the RID pool on domain controllers.
The RID master is responsible for processing RID pool requests from all domain controllers in a particular domain. When a DC creates a security principal object such as a user or group, it attaches a unique Security ID (SID) to the object. This SID consists of a domain SID (the same for all SIDs created in a domain), and a relative ID (RID) that is unique for each security principal SID created in a domain.
Each DC in a domain is allocated a pool of RIDs that it is allowed to assign to the security principals it creates. When a DC’s allocated RID pool falls below a threshold, that DC issues a request for additional RIDs to the domain’s RID master. The domain RID master responds to the request by retrieving RIDs from the domain’s unallocated RID pool and assigns them to the pool of the requesting DC. At any one time, there can be only one domain controller acting as the RID master in the domain.
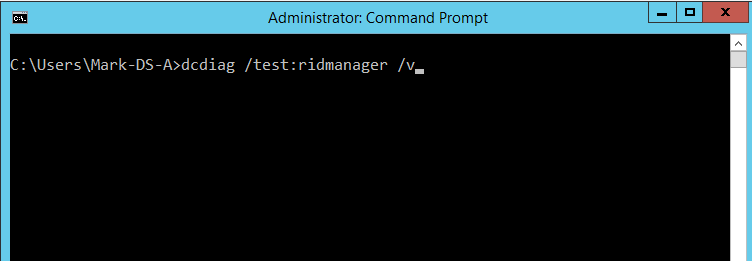
We can check the RID pool by command line. Open the command line and run the below mentioned command to get the RID pool status.
DCDIAG /Test:Ridmanager /v

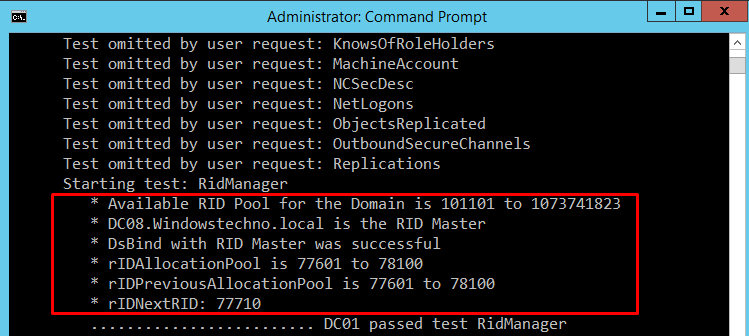
Once command is executed, below output come that will show you the RID pool status.

To raise the value of available RID pools using adsiedit and the calculator
- Open Server Manager, click Tools and click ADSI Edit.
- Right-click, select Connect to and connect do the Default Naming Context and click OK. Screenshot that shows how to connect to the Default Naming Context
- Browse to the following distinguished name path: CN=RID Manager$,CN=System,DC=<domain name>. Screenshot that shows how to browse to the distinguished name path.
- Right-click and select the properties of CN=RID Manager$.
- Select the attribute rIDAvailablePool, click Edit, and then copy the large integer value to the clipboard. Screenshot that shows the selected rIDAvailablePool attribute.
- Start calculator, and from the View menu, select Scientific Mode.
- Add 100,000 to the current value. Screenshot that shows where to add 100,000 to the current value.
- Using ctrl-c, or the Copy command from the Edit menu, copy the value to the clipboard.
- In the edit dialog of adsiedit, paste this new value. ADSI Edit
- Click OK in the dialog, and Apply in the property sheet to update the rIDAvailablePool attribute.
To raise the value of available RID pools using LDP
- At the command prompt, type the following command, and then press ENTER: ldp
- Click Connection, click Connect, type the name of RID manager, and then click OK. Screenshot that shows where to type the name of the RID manager.
- Click Connection, click Bind, select Bind with credentials and type your administrative credentials, and then
- click OK. Screenshot that shows the Bind with credentials option.
- Click View, click Tree and then type the following distinguished name path: CN=RID Manager$,CN=System,DC=domain name Screenshot that shows where you type the distinguished name path.
- Click Browse, and then click Modify.
- Add 100,000 to the current rIDAvailablePool value, and then type the sum into Values.
- In Dn, type cn=RID Manager$,cn=System,dc=<domain name>.
- In Edit Entry Attribute, type rIDAvailablePool.
- Select Replace as the operation, and then click Enter. Screenshot that shows the Replace option.
- Click Run to run the operation. Click Close.
- To validate the change, click View, click Tree, and then type the following distinguished name path: CN=RID Manager$,CN=System,DC=domain name.
- Check the rIDAvailablePool attribute.
So, that’s all in this blog. I will meet you soon with next stuff .Have a nice day !!!
Recommended contents
How to Check the Active Directory Database Integrity
Disabling and Enabling the Outbound Replication
DFS Replication Service Stopped Replication
What is Strict Replication Consistency
The replication operation failed because of a schema mismatch between the servers involved
Troubleshooting ad replication error 8418 the replication operation failed because of a schema mismatch between the servers
How to export replication information in txt file
Repadmin Replsummary
Enabling the outbound replication
Disabling and enabling replication on schema master domain controller
How to enable strict replication consistency
How to prevent lingering objects replication in active directory
AD replication process overview
How to force active directory replication
Change notification in replication process
How to check replication partner for a specific domain controller
dcdiag test replications
DFS Replication Event
Unidirectional replication
Guys please don’t forget to like and share the post. You can also share the feedback on below windows techno email id.
If you have any questions feel free to contact us on admin@windowstechno.com also follow us on facebook@windowstechno to get updates about new blog posts.
