ipconfig
ipconfig is a command-line utility in Microsoft Windows that displays the current configuration of the network interfaces on a computer. When you run the ipconfig command, it will display information such as the IP address, subnet mask, and default gateway of each network adapter on the computer.
To run ipconfig, open the command prompt by typing “cmd” into the Windows search bar, then click on the Command Prompt app. Once the command prompt is open, type “ipconfig” and press Enter. The output will display information about the network interfaces on your computer.
There are several options that you can use with the ipconfig command to display more specific information, such as ipconfig /all to display detailed information for all adapters, or ipconfig /renew to release and renew the IP address configuration for all adapters.
How to use ipconfig command
The ipconfig command is a command-line utility in Microsoft Windows that displays the current configuration of the network interfaces on a computer. Here are the steps to use the ipconfig command:
- Open a Command Prompt window: Click on the Start menu and type “cmd” into the search bar. Then, click on the Command Prompt app to open a Command Prompt window.
- Type “ipconfig” and press Enter: In the Command Prompt window, type “ipconfig” and press the Enter key. This will display the current configuration of the network interfaces on your computer.
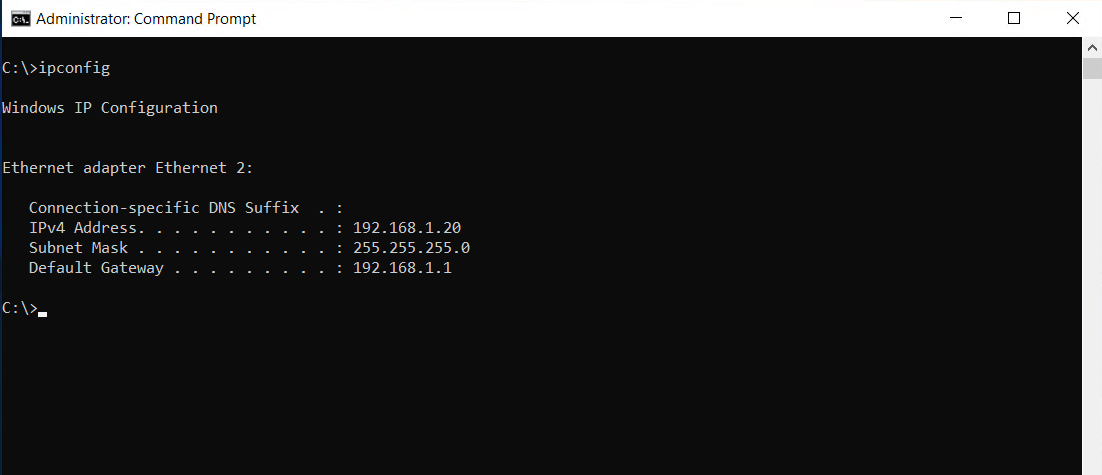
- View the output: The output will display information such as the IP address, subnet mask, and default gateway of each network adapter on your computer. You can scroll through the output to view the information for each adapter.
- Use additional options: There are several additional options that you can use with the ipconfigcommand to display more specific information, such as ipconfig /all to display detailed information for all adapters, or ipconfig /renew to release and renew the IP address configuration for all adapters.
Note: The ipconfig command is only available on Windows operating systems. On other operating systems such as Linux or macOS, you would need to use a different command such as ifconfig or ip to view network interface information.
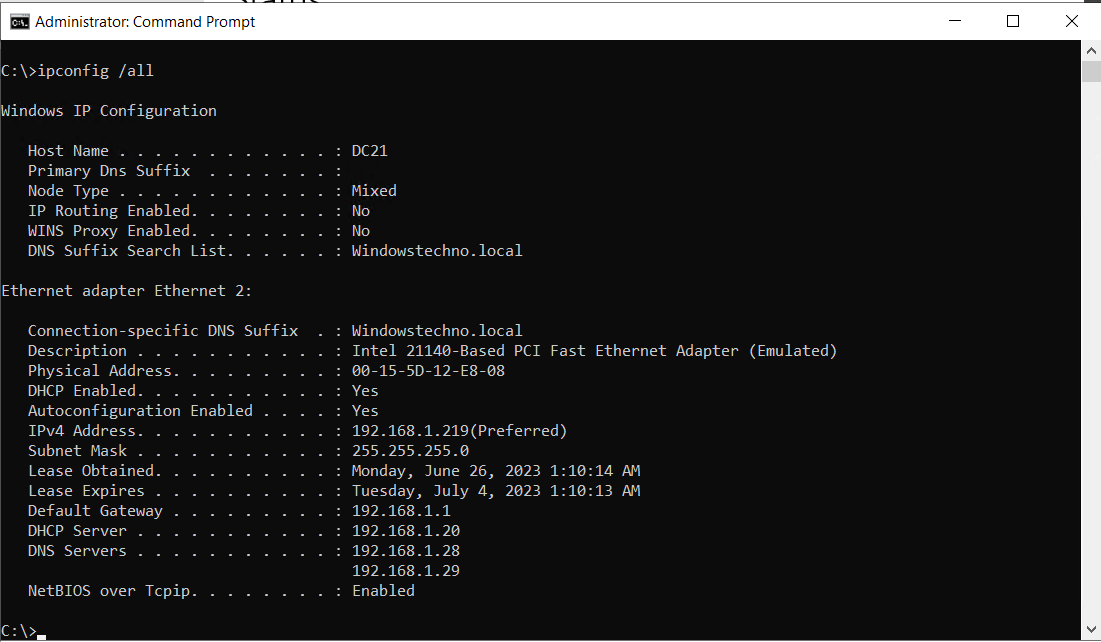
Ipconfig /all
The ipconfig /all command is a variation of the ipconfig command in Microsoft Windows that displays detailed information for all network adapters on a computer. Here are the steps to use the ipconfig /all command:
- Open a Command Prompt window: Click on the Start menu and type “cmd” into the search bar. Then, click on the Command Prompt app to open a Command Prompt window.
- Type “ipconfig /all” and press Enter: In the Command Prompt window, type “ipconfig /all” and press the Enter key. This will display detailed information for all network adapters on your computer, including physical addresses, DHCP information, DNS information, and more.
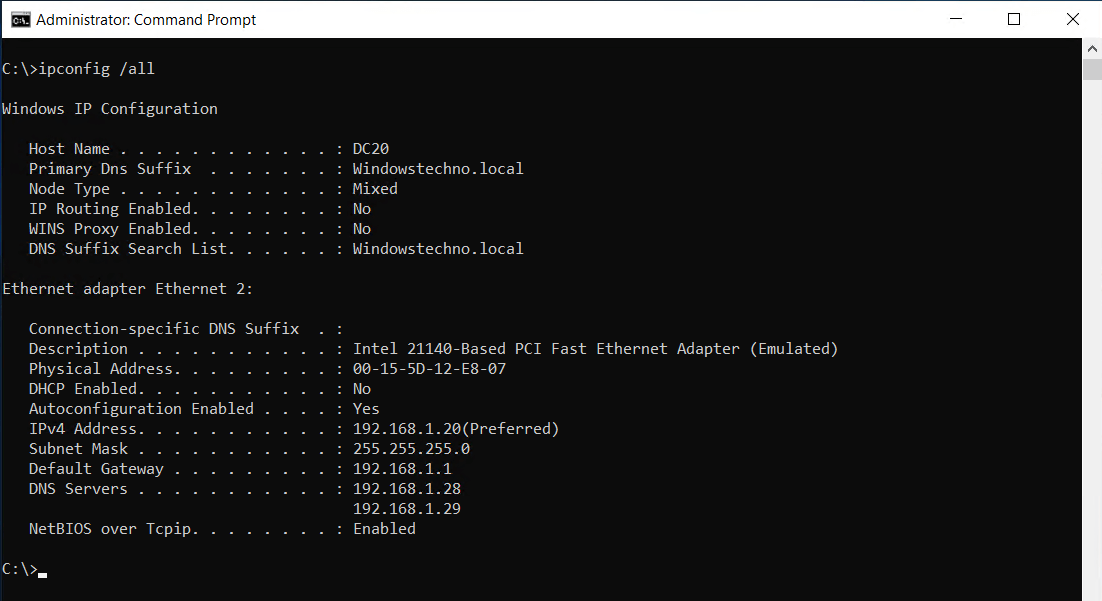
- View the output: The output will display a large amount of information for each network adapter on your computer. You can scroll through the output to view the information for each adapter.
- Use additional options: There are several additional options that you can use with the ipconfig command to display more specific information, such as ipconfig /renew to release and renew the IP address configuration for all adapters, or ipconfig /displaydns to display the contents of the DNS resolver cache.
C:\>ipconfig /displaydns

Windows IP Configuration

dc11.windowstechno.local
----------------------------------------
Record Name . . . . . : dc11.windowstechno.local
Record Type . . . . . : 1
Time To Live . . . . : 3268
Data Length . . . . . : 4
Section . . . . . . . : Answer
A (Host) Record . . . : 192.168.1.29


dc10.windowstechno.local
----------------------------------------
Record Name . . . . . : dc10.windowstechno.local
Record Type . . . . . : 1
Time To Live . . . . : 2984
Data Length . . . . . : 4
Section . . . . . . . : Answer
A (Host) Record . . . : 192.168.1.28

_ldap._tcp.ind-chd._sites.dc._msdcs.windowstechno.local
----------------------------------------
Record Name . . . . . : _ldap._tcp.IND-CHD._sites.dc._msdcs.Windowstechno.local
Record Type . . . . . : 33
Time To Live . . . . : 268
Data Length . . . . . : 16
Section . . . . . . . : Answer
SRV Record . . . . . : dc09.windowstechno.local
100
100
389

Record Name . . . . . : _ldap._tcp.IND-CHD._sites.dc._msdcs.Windowstechno.local
Record Type . . . . . : 33
Time To Live . . . . : 268
Data Length . . . . . : 16
Section . . . . . . . : Answer
SRV Record . . . . . : dc11.windowstechno.local
0
100
389

Record Name . . . . . : dc11.windowstechno.local
Record Type . . . . . : 1
Time To Live . . . . : 268
Data Length . . . . . : 4
Section . . . . . . . : Additional
A (Host) Record . . . : 192.168.1.29

C:\>
Note: The ipconfig /all command can be useful for troubleshooting network issues or viewing detailed information about network adapters on your computer. However, because it displays a large amount of information, it can be overwhelming to navigate. Be sure to review the output carefully to identify any issues or discrepancies in network configuration.
Additionally, we have a video below that demonstrates the same. Do not forget to check this. Please view the video in its entirety for improved text visibility.
Ipconfig /release
The ipconfig /release command is a variation of the ipconfig command in Microsoft Windows that releases the current IP address configuration for all network adapters on a computer. Here are the steps to use the ipconfig /release command:
- Open a Command Prompt window: Click on the Start menu and type “cmd” into the search bar. Then, click on the Command Prompt app to open a Command Prompt window.
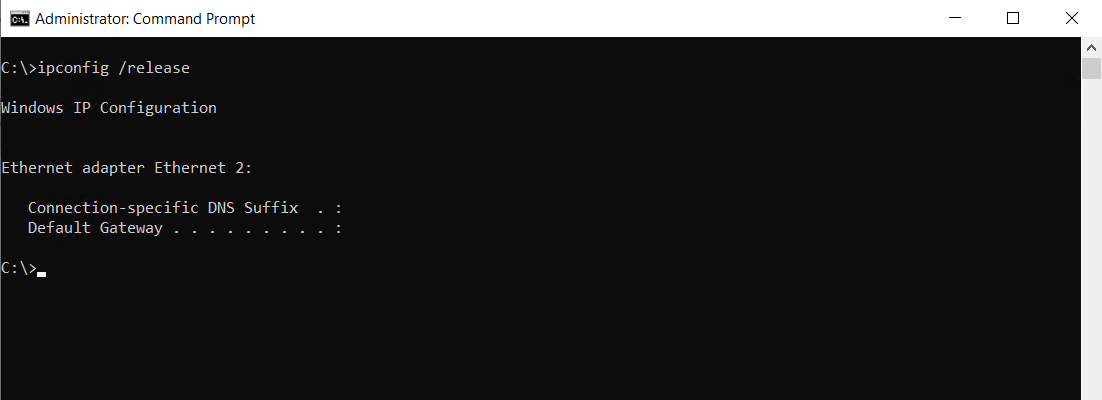
- Type “ipconfig /release” and press Enter: In the Command Prompt window, type “ipconfig /release” and press the Enter key. This will release the current IP address configuration for all network adapters on your computer.
- Confirm the release: You will be prompted to confirm that you want to release the IP address configuration. Type “Y” and press Enter to confirm.
- View the output: The output will display information about each network adapter that had its IP address configuration released.
Note: The ipconfig /release command can be useful for troubleshooting network issues or changing the IP address configuration for a network adapter. However, after using this command, your computer will no longer be able to communicate on the network until you renew the IP address configuration using the ipconfig /renew command. Be careful when using this command, as it can cause temporary loss of network connectivity.
Ipconfig /renew
The ipconfig /renew command is a variation of the ipconfig command in Microsoft Windows that renews the IP address configuration for all network adapters on a computer. Here are the steps to use the ipconfig /renew command:
- Open a Command Prompt window: Click on the Start menu and type “cmd” into the search bar. Then, click on the Command Prompt app to open a Command Prompt window.
- Type “ipconfig /renew” and press Enter: In the Command Prompt window, type “ipconfig /renew” and press the Enter key. This will attempt to renew the IP address configuration for all network adapters on your computer.

- Wait for the command to complete: The ipconfig /renew command will attempt to obtain a new IP address configuration from the DHCP server on your network. It may take several seconds or longer for the command to complete, depending on your network configuration and connectivity.
- View the output: The output will display information about each network adapter that had its IP address configuration renewed, including the new IP address, subnet mask, and default gateway.
Note: The ipconfig /renew command can be useful for troubleshooting network issues or obtaining a new IP address configuration for a network adapter. However, if the DHCP server on your network is not available or does not have any available IP addresses to assign, the ipconfig /renew command may not be successful. If this happens, you may need to manually configure the IP address for the network adapter using the ipconfig command or the Windows Network and Sharing Center.
ipconfig /flushdns Flush DNS Command
The ipconfig /flushdns command is a variation of the ipconfig command in Microsoft Windows that clears the contents of the DNS resolver cache. Here are the steps to use the ipconfig /flushdns command:
- Open a Command Prompt window: Click on the Start menu and type “cmd” into the search bar. Then, click on the Command Prompt app to open a Command Prompt window.
- Type “ipconfig /flushdns” and press Enter: In the Command Prompt window, type “ipconfig /flushdns” and press the Enter key. This will clear the contents of the DNS resolver cache on your computer.
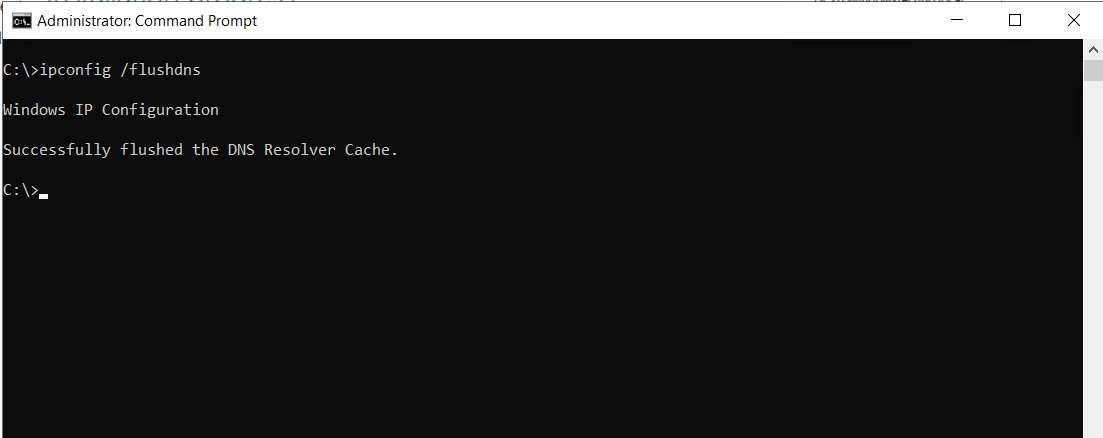
- View the output: The output will display a message indicating that the DNS resolver cache was successfully cleared.
Note: The DNS resolver cache is used by your computer to store information about DNS names and IP addresses that have been recently accessed. Clearing the DNS resolver cache can be useful for troubleshooting DNS issues or resolving issues with cached DNS information. After using the ipconfig /flushdns command, your computer will need to query a DNS server to resolve DNS names, which may take slightly longer than using cached information.
Ipconfig on Linux
ipconfig is a command that is specific to Windows operating systems. On Linux, the command for displaying network interface configuration information is ifconfig.
Here are the steps to use the ifconfig command on Linux:
- Open a terminal window: Open a terminal window by clicking on the terminal application in your Linux distribution.
- Type “ifconfig” and press Enter: In the terminal window, type “ifconfig” and press the Enter key. This will display the network interface information for your Linux system.
- View the output: The output will display information about each network interface on your system, including the IP address, netmask, and broadcast address.
- Use additional options: There are several additional options that you can use with the ifconfigcommand to display more specific information, such as ifconfig -a to display information for all network interfaces, or ifconfig eth0 to display information for a specific network interface (in this case, “eth0”).
Note: The ifconfig command is available on most Linux distributions, but some newer distributions may use the ip command instead. The ip command is a more modern replacement for ifconfig and provides additional functionality. To use the ip command, simply replace “ifconfig” with “ip” in the above steps.
View DNS servers on Linux
In Linux, you can view the DNS servers that are configured for your system using the resolv.conf file. Here are the steps to view the DNS servers on Linux:
- Open a terminal window: Open a terminal window by clicking on the terminal application in your Linux distribution.
- Type “cat /etc/resolv.conf” and press Enter: In the terminal window, type “cat /etc/resolv.conf” and press the Enter key. This will display the contents of the conffile.
- View the DNS server information: The conffile will contain information about the DNS servers that are configured for your system, including the IP addresses of the DNS servers and any search domains that are configured.
Note: The resolv.conf file can be edited manually to add or remove DNS servers or search domains. However, in most cases, the resolv.conf file is managed automatically by the system and is updated by the DHCP client or other network configuration tools. Changes made to the resolv.conf file manually may be overwritten by these tools.
Renew IP Address on Linux
In Linux, you can renew the IP address of a network interface using the dhclient command. Here are the steps to renew the IP address on Linux:
- Open a terminal window: Open a terminal window by clicking on the terminal application in your Linux distribution.
- Type “sudo dhclient <interface>” and press Enter: In the terminal window, type “sudo dhclient” followed by the name of the network interface that you want to renew the IP address for. For example, if you want to renew the IP address for the “eth0” interface, you would type “sudo dhclient eth0” and press the Enter key.
- Wait for the command to complete: The dhclientcommand will attempt to obtain a new IP address configuration from the DHCP server on your network. It may take several seconds or longer for the command to complete, depending on your network configuration and connectivity.
- View the output: The output will display information about the IP address configuration that was obtained for the network interface, including the new IP address, subnet mask, and default gateway.
Note: The dhclient command is used to obtain IP address configuration information from a DHCP server. If your network uses static IP addressing, you will need to manually configure the IP address for the network interface using the ifconfig or ip command. Also, the name of the network interface may vary depending on your Linux distribution and network configuration. You can use the ifconfig or ip command to view the names of the network interfaces on your system.
Difference between IPv4 and IPv6
IPv4 and IPv6 are both versions of the Internet Protocol (IP), which is a protocol used to transfer data over the Internet. The main difference between IPv4 and IPv6 is the size of the address space.
IPv4 addresses are 32 bits long and are written in decimal format, with each of the four 8-bit segments separated by a period (e.g. 192.168.1.1). The maximum number of unique IPv4 addresses is 2^32, which is approximately 4.3 billion addresses. This may seem like a large number, but due to the growth of the Internet and the increasing number of devices that connect to it, the number of available IPv4 addresses is becoming scarce.
IPv6 addresses, on the other hand, are 128 bits long and are written in hexadecimal format, with each of the eight 16-bit segments separated by a colon (e.g. 2001:0db8:85a3:0000:0000:8a2e:0370:7334). The maximum number of unique IPv6 addresses is 2^128, which is an enormous number that is virtually limitless. This means that IPv6 has a much larger address space and can support a virtually unlimited number of devices and users.
In addition to the larger address space, IPv6 has several other advantages over IPv4, including better support for mobile devices, improved security features, and more efficient routing and packet processing. However, IPv6 adoption has been slow due to the need to upgrade infrastructure and devices to support the new protocol.
Some challenges to upgrading infrastructure to support IPv6
There are several challenges to upgrading infrastructure to support IPv6, including:
Compatibility: IPv6 is not backwards compatible with IPv4, which means that devices and applications that are designed to work with IPv4 may not work properly with IPv6. This can lead to compatibility issues and the need to upgrade hardware and software to support IPv6.
Cost: Upgrading infrastructure to support IPv6 can be expensive, especially for organizations with large networks and many devices. This may require purchasing new hardware and software, upgrading network infrastructure, and training staff on how to configure and manage IPv6.
Lack of support: Some devices and applications may not support IPv6, which can make it difficult to roll out the new protocol across an organization. This may require working with vendors and developers to ensure that their products support IPv6.
Addressing: Although IPv6 provides a virtually unlimited address space, managing and configuring IPv6 addresses can be more complex than IPv4. This may require additional training and expertise to manage IPv6 addresses effectively.
Security: IPv6 introduces new security features, such as IPsec, which can improve network security. However, configuring and managing these features can be complex and may require additional expertise.
Overall, upgrading infrastructure to support IPv6 requires careful planning, investment, and expertise. It is important to assess the needs of the organization, evaluate the costs and benefits of upgrading, and develop a plan for implementation and management.
Some common security risks associated with IPv6
While IPv6 includes several new security features that can improve network security, there are also some new security risks that organizations should be aware of. Some of the common security risks associated with IPv6 include:
Address scanning: Because of the large address space in IPv6, it is more difficult to scan for devices and identify vulnerabilities. However, attackers can still scan for devices using tools that are designed to scan IPv6 addresses.
Transition mechanisms: In order to support both IPv4 and IPv6, organizations may use transition mechanisms such as tunneling and translation. These mechanisms can introduce new security risks if they are not configured properly.
Neighbor discovery: IPv6 includes a neighbor discovery protocol that allows devices to find and communicate with each other on a network. However, this protocol can be used by attackers to perform reconnaissance or launch attacks.
IPsec: IPv6 includes support for IPsec, which can improve network security by encrypting traffic. However, configuring and managing IPsec can be complex, and misconfigurations can lead to security vulnerabilities.
Rogue devices: The large address space in IPv6 can make it more difficult to detect rogue devices on a network. Attackers can use this to their advantage by deploying rogue devices that can intercept or modify network traffic.
Overall, organizations should be aware of these and other security risks associated with IPv6, and should take steps to mitigate them through proper configuration, monitoring, and management of their IPv6 networks. This may include implementing security policies, using appropriate security tools and technologies, and regularly testing and auditing the network for vulnerabilities.
Some common tools and technologies that can help organizations monitor their IPv6 networks for vulnerabilities.
There are several tools and technologies that can help organizations monitor their IPv6 networks for vulnerabilities. Some common tools and technologies include:
- Network scanning tools: Network scanning tools such as Nmap and Nessus can be used to scan for open ports, identify devices, and detect vulnerabilities on IPv6 networks.
- Intrusion detection/prevention systems (IDS/IPS): IDS/IPS technologies can be used to detect and prevent attacks on IPv6 networks. These systems can monitor network traffic and look for patterns that indicate malicious activity.
- Security information and event management (SIEM): SIEM technologies can be used to collect and analyze log data from IPv6 devices and network devices. This can help identify security incidents and detect anomalies that may indicate a security breach.
- Firewalls: Firewalls can be used to control access to IPv6 networks and enforce security policies. Firewalls can be configured to block traffic from known malicious IP addresses or to block traffic that does not conform to network policies.
- IPv6-capable security appliances: Organizations can deploy IPv6-capable security appliances, such as intrusion prevention systems (IPS) and web application firewalls (WAF), to help secure IPv6 networks.
Overall, organizations should use a combination of tools and technologies to monitor and secure their IPv6 networks. It is important to regularly test and audit the network for vulnerabilities, and to stay up-to-date with the latest security threats and best practices for IPv6 security.
So, that’s all in this blog. I will meet you soon with next stuff. Have a nice day!!!
Guys please don’t forget to like and share the post. Also join our WindowsTechno Community and where you can post your queries/doubts and our experts will address them.
You can also share the feedback on below windows techno email id.
If you have any questions, feel free to contact us on admin@windowstechno.com also follow us on facebook@windowstechno to get updates about new blog posts.