windows 11 update fails after restart
Windows 11 update fails after restart
- If Windows 11 does not update after restarting, try running a troubleshooter from Settings.
- Do a system file scan instead to repair and replace any faulty files.
- Nevertheless, before you do anything else, make sure you have adequate space on your hard disc.
We recommend DriverFix to resolve a lot of computer issues: This software keeps your drivers up and running, protecting you from common computer issues and hardware failure. Verify all of your drivers immediately in three simple steps:
- Install DriverFix
- To identify all faulty drivers, click Start Scan.
- To obtain fresh versions of drivers and avoid system malfunctions, click Update Drivers.
Microsoft releases Windows updates on a regular basis, and they are critical for keeping your computer safe. As a result, we will show how to resolve the Windows 11 not updating after restart problem. It is strongly recommended that you generate a backup of your personal data before starting with the solutions to ensure that you do not lose anything by mistake. A slow internet connection, third-party antivirus software, a lack of accessible disc space, damaged update files, or driver difficulties are all possible causes of the not updating after restart issue.
Why should I update my OS?
Upgrading your software and operating system offers various advantages. It all comes down to making changes. Finding and removing computer bugs, as well as correcting security flaws, are examples of such responsibilities. Hackers are drawn to security defects, also known as software vulnerabilities, since they allow them to obtain access to a system. Hackers can take advantage of the problem by building programmes that specifically targets it.
How can I fix Windows 11 not updating after restart?
1. Run the Windows Update troubleshooter
- Hold the Windows key + I and navigate to System from the left panel followed by Troubleshoot.
After you are inside the Troubleshoot menu, click on the Other trouble-shooters option in order to find more troubleshooters. Scroll down until you find the Windows Update troubleshooter and click Run next to it.
2. Free up drive space
- Open File Explorer and click on This PC.
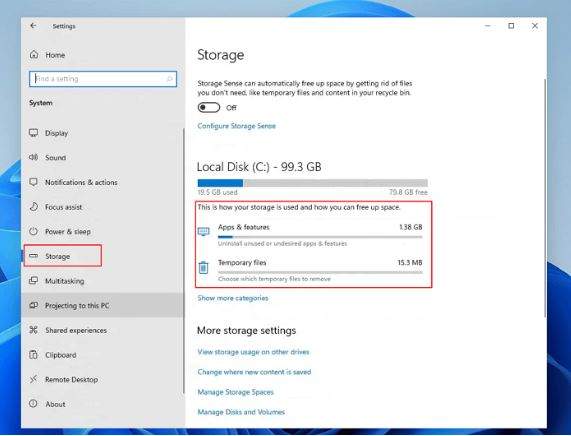
Now check whether the drive you have set to install Windows updates on is full. If it is, try to go through it and delete redundant data.
3. Update your drivers
DriverFix is a small program that updates, patches, and replaces any device drivers that need to be updated. It is appropriate for individuals who do not want to spend time reviewing their drivers or debugging driver-related issues.
- Download and install DriverFix.
- Launch the app.
- Wait for the software to detect all your faulty drivers.
- You will now be presented with a list of all the drivers that have issues, and you just need to select the ones you’d liked fixed.
- Wait for DriverFix to download and install the newest drivers.
- Restart your PC for the changes to take effect.
4. Disable your antivirus
- Expand the icons from your taskbar on the right side and right-click on the antivirus one. Choose Avast shields control followed by Disable for 10 minutes.
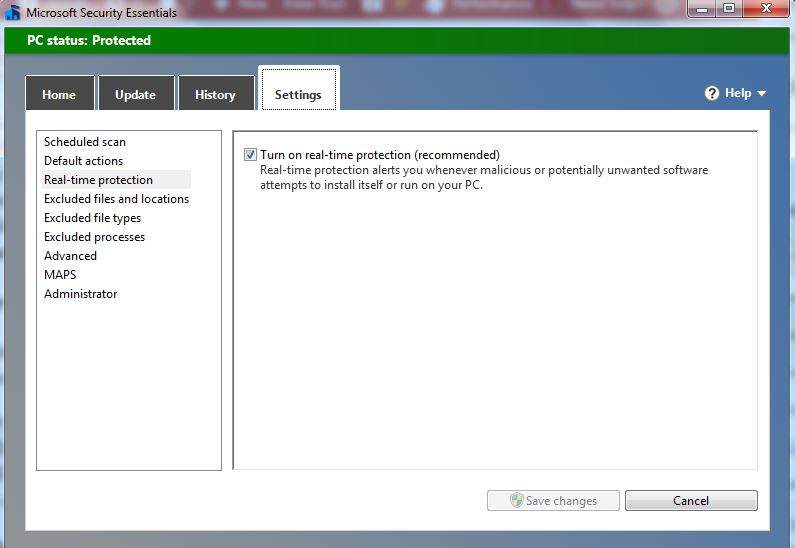
If you use another antivirus software, the instructions for temporarily stopping it are similar. If the problem has been resolved, your antivirus programme was most likely the source of the problem. You could try another antivirus tool for Windows 11 to safeguard your laptop and avoid future antivirus-related issues.
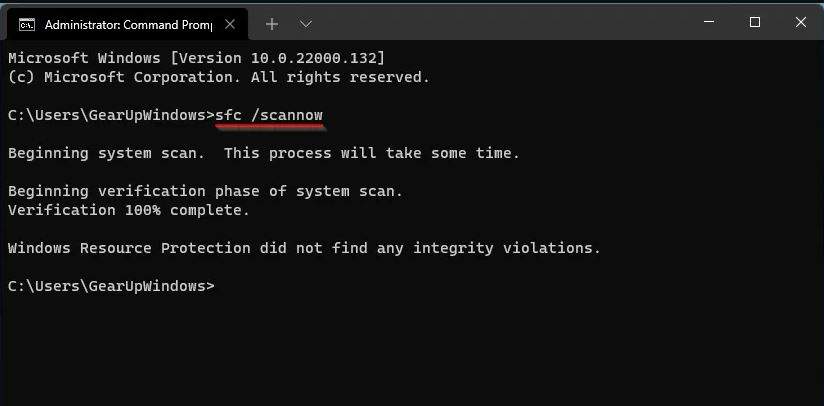
5. Run the SFC scan
- Open Command Prompt as an administrator by typing cmd inside the Windows Search function and right-clicking on it.
Now type or paste the following command and press Enter
sfc /scannow
Here are the five ways you may use to resolve the Windows 11 not updating after restart problem. But, if you want more assistance, please see our page on what to do if Windows Update is not working.
6. Run the BITS and Windows Update Service Again
Press ‘Windows + R’, to open the Run command and write there services.msc and click on ‘Ok’.
- Right-click on Background Intelligent Transfer Service (BITS) and stop it through the context menu.
- Again right-click on Windows Update Service and do the same to stop. Then press ‘Windows + E’ to open File Explorer.
- Go for this location through address bar: C:\Windows\SoftwareDistribution.
- Select all and delete them from context menu.
- Come again to Service App and right-click on Background Intelligent Transfer Service (BITS) and start it through the context menu.
- Same process for Windows Update Service and do the same to start it again.
Now you can go for your Windows Update. This time, Windows 11 download should not get stuck anymore.
7. Use Bootable USB Install Windows 11
- Keep connected your USB flash drive to computer.
- Restart your computer and press specific keys like functions key, del, Esc, etc.
- Come to Boot tab to select your USB flash drive pressing the arrow key.
- Save it, and continue to boot your computer through bootable USB flash drive.
- It will open Windows setup interface, set time, language, currency format and keyboard, then click on ‘Install Now’.
- Click on ‘I don’t have any product key’ and then select Custom to install Windows only.
- Select partition and start installing.
8.Restart your Windows in Safe Mode
- Click on Start and then Settings.
- Click on Update & Security.
- Click on Recovery, then look on the Advanced Startup section where you find Restart Now, click on it.
- After restarting the computer a ‘Choose an Option’ screen will appear, from there click on Troubleshoot and choose ‘Advanced Option’. Then click on ‘Startup Settings’.
Download the Latest Update Manually
- If you’re still having trouble installing the update, try downloading and installing it manually.
- Go to Microsoft Update Catalogue.
- Type KB number of the security update on the search bar that was unfinished.
- Save it and after downloading, run it as administrator.
How to upgrade windows 10 to windows 11
If you are still on Windows 10, use these easy steps to upgrade to Windows 11.
The experience is similar to installing a cumulative update, with the exception that this procedure will take longer (approximately an hour) to finish due to the download size (about 4 to 5GB) and because the process will execute a complete installation.
Although Windows Update is a non-destructive operation, it is nevertheless suggested that you create a temporary complete backup before starting in case something goes wrong and you need to roll back or restore some files.
- With Microsoft’s PC Health Check programme, ensure that your Computer is officially supported.
- Make a backup of all of your critical papers, programmes, and data.
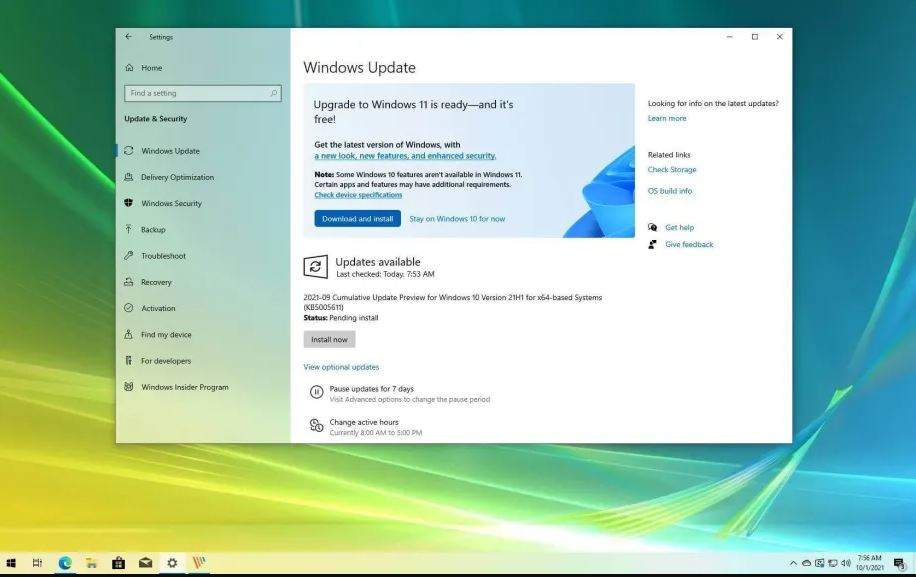
Upgrade to Windows 11 from Windows Update
To upgrade to Windows 11 22H2 from 10 via the Windows Update settings, use these steps: Open Settings.
- Click on Update & Security.
- Click on Windows Update.
- Click the Check for updates button.

- Click the “Download and install” button.
- Click the Restart now button.
Once you complete the steps, Windows 11 will proceed to install automatically.
So, that’s all in this blog. I will meet you soon with next stuff .Have a nice day!!!
Recommended content
RODC Installation Guide- Step by step guide to install read only domain controller
RODC Filtered Attribute Set
Installing and configuring a RODC in Windows Server-2012
How to find the GUID of Domain Controller
Understanding Group Policy Preferences
Group Policy Verification Tool GPOTool Exe
Group Policy Health Check on Specific Domain Controller
Netlogon Folder in Active Directory
Custom Attributes in Active Directory
Tombstone Lifetime of My Active Directory Forest
Computers AD Site From the Command Line
Active Directory Database Integrity
Disabling and Enabling the Outbound Replication
DFS Replication Service Stopped Replication
Strict Replication Consistency
The replication operation failed because of a schema mismatch between the servers involved
Troubleshooting ad replication error 8418 the replication operation failed because of a schema mismatch between the servers
Replication information in txt file
Repadmin Replsummary
Enabling the outbound replication
Guys please don’t forget to like and share the post.Also join our WindowsTechno Community and where you can post your queries/doubts and our experts will address them .
You can also share the feedback on below windows techno email id.
If you have any questions feel free to contact us on admin@windowstechno.com also follow us on facebook@windowstechno to get updates about new blog posts.